Best Clay for Sculpting
If you admire the creativity of others, why not try sculpting for yourself? You may discover hidden talents! Sculpting is a creative, interesting and therapeutic hobby which is ideal for both adults and youngsters. But which type of clay should you use to fashion your masterpieces?
There are four principle types of clay that you should consider working with. The best clay for sculpting will largely depend on the equipment you have at your disposal. Do you own or have access to a kiln? Does it matter how much mess you make? Do you have a studio in which to make that mess?
Here's the low down on your choices to help you decide which would be the best type of clay for sculpting.
Jump to..
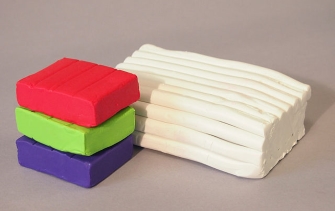
Polymer Clays
Polymer clay provides a fabulous alternative to ceramic clay for home sculpting projects. It has the consistency of plasticine and can be bought in varying degrees of hardness. The clay can be softened by manually working it, running it through a pasta machine or adding a small amount of alcohol. Polymer clay will bake hard, just like ceramic clay, but can be fired at around 130°C rather than the 800°C to 2000°C temperatures required for ceramic clays. This means that you can use your oven rather than having to invest in a kiln.
Polymer clay has many advantages, particularly if you do not have a studio or kiln. It is almost certainly the best clay to use for sculpting when kids are involved. They won't make too much of a mess, the material is safe and they can fire their work to create pieces to keep.
Available in a variety of colours, polymer clays can also be painted in acrylics or coloured using air-dry glazes. These clays do leave powdery residues when they dry and so are a healthier option. The dust from ceramic clay may be ingested or inhaled and many ceramic glazes that you might want to use are toxic.
To sculpt with polymer clay, bring it to a malleable consistency. When you are ready, create your piece on a smooth ceramic tile. This will enable you to roll out elements of your piece without leaving marks and your sculpture can be fired standing on the tile.
Polymer clays are susceptible to fingerprint marks. You can avoid these by wearing latex gloves, brushing your piece with talcum powder or sanding it after it is cured. A slicing blade can be used to make even cuts and to create small elements of your sculpture. Use a rolling pin or pasta machine to create sheets. Other useful tools can be found around the house including toothpicks for making holes, cuticle sticks for making depressions and garlic presses for creating hair to dress figurative works.
The clays are available in many colours but you can create your own by mixing coloured clays together.
Polymer clay remains soft until it is cured, which is achieved by baking the piece in your domestic oven for 20-30 minutes, usually at about 270°F. After the baking, the clay is cured and remains hard forever. It can then be protected with a polymer glaze or sprayed with acrylic sealing.
Cold Porcelain
Cold porcelain is a corn-starch based modelling material which remains strong and slightly flexible after air-drying. This material does not need firing and looks more like porcelain than flour based clays. Cold porcelain lends itself to intricate sculptures and is generally coloured by artists before sculpting rather than painted afterwards. The clay does need to be pigmented otherwise it is too translucent.
You can buy cold porcelain modelling clay but you are also able to make your own. It isn't a particularly easy process and it is important to work with the right ingredients. Consistency is the key to success as cold porcelain which is too moist will be too sticky to work with efficiently.
Cold Porcelain Recipe
- 500ml corn Starch
- 500ml white wood glue
- 15ml lemon juice
- 30ml baby oil
- 15ml white tempera paint
- 15ml lanolin and silicone free face cream (Nivea)
Mix all the ingredients together in a bowl, excluding the face cream, which you should add when kneading the paste. When the mixture is smooth, heat it in a microwave for 3 minutes on full power. Stir the paste every minute to ensure it cooks evenly. Add the face cream and knead the paste for at least 5 minutes and then form a spiral to prevent the formation of air bubbles. Place the paste in a plastic bag greased with the face cream and seal it to store the clay. The clay is ready to use as soon as it is cool.
Cold porcelain can be stored at room temperature for up to 45 days or indefinitely in your freezer.
Here's another popular Cold Porcelain recipe video from YouTube:
Ceramic Clay
Ceramic clays can be wonderful to work with and don't have to cost the earth. But they are awkward to store, they require a kiln to fire the resulting sculptures and they create a significant amount of mess - something to bear in mind when kids are involved!
Ceramic clay will come out of the bag in a soft and pliable state. This is fine for forming the approximate shape of your piece. You should create your basic form by building up blobs of the clay to the required size and shape. The clay will be too soft for detailed work so you will then need to exercise patience.
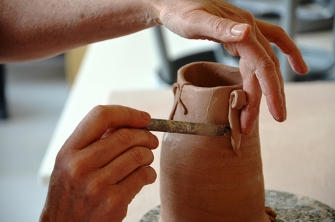
Wait until your sculpture hardens off enough to hold its own weight against the force of gravity. It needs to be of a consistency that you can't easily squish using your hands. It should still be relatively moist and you will need tools to work with the material effectively.
Place your work on a damp base (bat) made from plaster of Paris. If you have to stop working on your piece before it is complete, cover it in a clear plastic bag to keep the clay moist. If your piece starts to become too dry as you work, spray it with a little water to keep it workable.
When you sculpt with ceramic clay, take care not to leave air pockets between the pieces of clay and you build your form and always maintain an even thickness. Otherwise your piece may crack or warp during drying and firing. Your piece will have to dry out thoroughly before firing. Leave it to stand, covered by the bag and then open the bag a little more each day. A gradual drying process over a period of days will minimise the chances of cracking.
When your sculpture is completely dry, it is ready to fire but for that you will need to invest in a kiln. Electric kilns are readily available and simple to install so, if you have the space, it would be possible to create a studio at home.
Plasteline Clay
A firm favourite with many comic artists and film special effects departments, plasteline clay is a popular choice. If your opportunities to work on your sculptures are few and far between, plasteline could be the clay you should use for sculpting as it never dries out.
Created from wax, oil, and clay flour, this modelling material does not harden and cannot be fired. You will need to make a mould from your finished pieces and then cast your sculptures. Plasteline may not be suitably pliable when taken out of the packet but can be softened using your hands, by heating it in a pan or by warming it in a microwave.
This material is relatively costly but is an excellent choice when precision is the order of the day. The repeated application of precise details is straightforward. Colour isn't an issue as you will be making moulds and casting them to create your finished pieces.
The Right Clay for Sculpting?
There is no right or wrong clay for sculpting as each of the available materials has advantages and disadvantages. Through experimenting with the clays you will discover the best choice for your needs. You may even discover that there is a place for all four in your artistic endeavours.